


Dehydrating food is one of the easiest and most affordable ways to preserve food. This beginner’s guide covers why dehydrating is worth learning (flavor, cost, shelf life, space savings), the best foods to start with, how to choose between stackable and box-style dehydrators, and how to store dehydrated food for maximum shelf life. Includes a complete recipe for dehydrated chili and a thorough FAQ covering everything from blanching vegetables to the difference between dehydrating and freeze drying. Based on years of firsthand experience starting with a $30 Craigslist dehydrator.
Dehydrating food used to seem like something that belonged in the same category as spinning my own wool — technically possible, but why would I go to all that trouble? Turns out the trouble is almost nonexistent, the results are fantastic, and a $30 Craigslist dehydrator changed how I think about food storage entirely.
This article has been completely rewritten and updated with current techniques and tips, April 2026.

Some of the links in this post may contain affiliate links for your convenience. As an Amazon Associate, I may earn a small commission from qualifying purchases without any increase in price to you.
In This Article
Why I Dehydrate, And Why You Should Too
I could make a long list of reasons to start dehydrating food, but if you’re just getting started and need the short version, here’s what actually matters.
The flavor is extraordinary. This one surprises people every time. Dehydrated food doesn’t taste like the sad, cardboard-textured stuff you find in trail mix. A thin slice of dehydrated tomato packs more flavor than a fresh one. Dehydrated peaches taste like concentrated sunshine. Something remarkable happens when the water leaves and the flavor intensifies. You end up with a snack that’s genuinely hard to stop eating, and adds a punch of flavor to anything you cook or bake.
You know exactly what’s in it. Read the ingredient list on a bag of commercially dried mango sometime. There’s the mango, sure, but there’s probably also sugar, citric acid, and sulfur dioxide to preserve the color. When you dehydrate your own food, the ingredient list is exactly one item long. This is particularly important to me as my current goal is to find new ways to make our home and our diets healthier than ever.
It stretches your food budget. Berries on sale this week? Dehydrate them. Garden producing more zucchini than your family can eat? Dehydrate it. Bought a flat of peaches because the price was right? Dehydrate them before they go soft. Dehydrating lets you buy food at its cheapest and most abundant and preserve it for months or years.
It takes up almost no space. Twenty pounds of fresh tomatoes filled two large glass jars in my pantry after slicing and dehydrating! That’s the kind of math that makes a difference when you’re trying to build a serious food supply in a normal house without a dedicated storage room.
The shelf life is impressive. Properly dehydrated food stored in airtight containers — Mason jars with oxygen absorbers, mylar bags, or vacuum-sealed bags — lasts anywhere from one to five years depending on the food. That’s not quite freeze-dried territory, but it’s far beyond fresh, and it costs a fraction of the price.
You don’t need fancy equipment. A basic dehydrator in the $50-100 range will handle everything a beginner needs. I started with a $30 Craigslist find and produced food my family actually wanted to eat. You can upgrade later if you catch the dehydrating bug like I did.
The equipment has a small footprint. I own a home freeze-dryer, and not only does it cost several times more than my Cosori dehydrator, it takes up a huge amount of space. My little Cosori can sit on the corner of my kitchen table in the busiest room of the house and barely be noticed.
The Best Foods to Start With
My best advice — start simple. These are the foods I had the most success with early on. They’re all low risk, high reward, and genuinely useful for food storage and everyday cooking.
Canned peaches. This is my top recommendation for absolute beginners. Buy a #10 can of peaches at Costco or Sam’s Club, pour them into a colander, rinse, lay the slices on your dehydrator trays, and dry at a medium setting until chewy. That’s it. The result is a sweet, concentrated snack your kids will actually fight over, and it costs a fraction of what you’d pay for commercially dried fruit. Store them in a vacuum-sealed bag or mason jar that has been vacuum sealed.
Herbs. Fresh herbs from the garden or the store dehydrate in just a few hours and the savings add up fast. A small bunch of fresh basil costs $3 at the grocery store and is slimy within a week. Dehydrated and stored in a small jar, that same bunch lasts for years. Rosemary, thyme, oregano, parsley, chives — they all dehydrate beautifully and taste far better than the dusty jars that have been sitting in your spice cabinet since 2019.
Applesauce. Spread a thin layer on a fruit leather tray and dehydrate until it peels away cleanly — and you’ve just made homemade fruit leather. Add cinnamon, pureed strawberries, or a spoonful of Greek yogurt before drying for variety. A #10 can of applesauce from Costco runs about $7-8 and produces a surprising amount of fruit leather. My kids have never complained about this one.
Mushrooms. Fresh mushrooms spoil faster than almost any other vegetable, and yet, in my kitchen, I use them all the time. Slice them, dry them, store them, and you’ll never throw out a slimy half-used container again. Dried mushrooms can also be ground into a powder and added to soups, stews, and sauces for a deep savory flavor without anyone knowing they’re there.
Carrots and celery. These are workhorses of the soup and stew world, and having them already dehydrated in your pantry means you never have to run to the store mid-recipe. Slice thin, dry until brittle, store in a jar. They rehydrate beautifully in anything liquid and since you’re doing all the slicing and chopping in one session, that’s time saved when you need them for a recipe.
Tomatoes. If you grow tomatoes or have access to them in bulk during summer, dehydrating is the best thing you can do with the overflow. Slice thin, dry until leathery or brittle depending on your preference, and store. Dehydrated tomatoes are intensely flavorful and take up almost no space. You can blend the dehydrated tomatoes until they’re a fine powder, and use that tomato powder in salsa, marinara sauce, and anywhere you want a tomato flavor.
One thing worth knowing: prep time is the only real work involved. Peeling, slicing, and laying food out on trays takes maybe 15-20 minutes for most batches. After that, you set the timer and walk away. The dehydrator does everything else while you get on with your day.
Dehydrated to Death Chili
Here’s where food dehydration gets really interesting. You’re not limited to individual ingredients. You can dehydrate entire meals and store them for camping trips, bug out bags, or long-term emergency food storage. This is the point where a lot of people realize there’s a lot more to dehydrating than fruit leather.
My friend takes this to another level entirely. She dehydrates sheets of spaghetti sauce, rehydrates them over a camp stove, and has almost-instant pasta sauce on a camping trip. She’s also been known to make what she calls “hamburger rocks” — fully cooked and dehydrated ground beef that rehydrates beautifully in soups and stews. Once you start thinking this way, the possibilities are hard to stop.
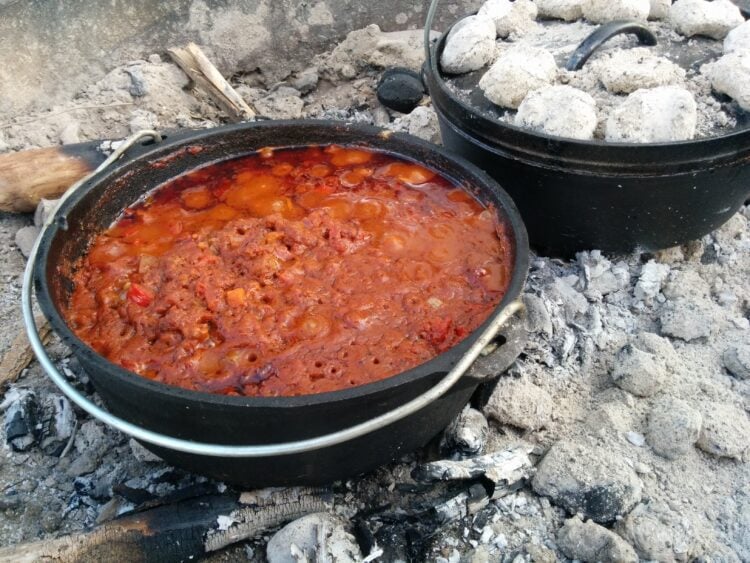
This recipe features a tomato-based sauce you dehydrate on fruit leather trays and, separately, dehydrated canned kidney beans. When you combine them with water, you have the quickest pot of chili ever. Bonus: this is a great recipe for camping when you’ll be using an off-grid cooking method, from a kerosene cookstove to a Dutch oven over hot coals.
- 2 cans tomato sauce
- 2 cans kidney beans, drained
- 1/4 c. chopped yellow onion
- 1 T. chili powder
- 1 t. cumin
- 1/2 t. salt
- 1/4 t. garlic powder
- 1/8 t. ground black pepper
In a food dehydrator, dehydrate the tomato sauce, kidney beans, and chopped onions. To dehydrate the sauce, spread it evenly on two fruit leather trays and dry until it can be easily peeled up and no moisture remains. The dehydration time for these three ingredients varies from dehydrator to dehydrator, but plan on at least six hours.
To store, combine the sauce, beans, onion, and seasonings in a jar with a tight-fitting lid, a Food Saver bag, or even a Zip-Loc bag, depending on how long you wish to store it. The sauce can be rolled up or even torn or cut into small pieces to better fit into the jar.
Cooking the dehydrated chili is a dream. Pour the dry ingredients into a large saucepan or pot, along with four cups of water. Cook over medium heat for at least 15-20 minutes or until the beans are completely rehydrated. You can add cooked meat or canned tomatoes at this point if you wish. As the chili heats, the sauce thickens nicely, but you may want to add a bit more water for a thinner consistency.
Serve alone, over rice, topped with grated cheddar cheese, saltines, tortilla chips, sour cream, or your own preferred chili toppings.
What You Need to Get Started
The good news is that dehydrating has one of the lowest barriers to entry of any food preservation method. You don’t need a pressure canner, specialized jars, an expensive home freeze dryer, or a chest freezer. Here’s what you actually need.
The Dehydrator
I’ll always be grateful for that $30 Nesco dehydrator I found on Craigslist. It lasted many, many years. Three years ago I graduated up to a stainless steel Cosori, and have loved using it. The price tag is budget-friendly, and the quality is excellent.
There are two basic designs of dehydrators to consider.
Stackable/round dehydrators like the NESCO and Presto models sit at the lower price point, usually $50-80. They’re a perfectly fine starting point and what I used when I was learning. The downside is uneven drying because the heat source is at the bottom or top, which means you’ll need to rotate trays partway through. They also have limited capacity.
Box/shelf dehydrators like the Cosori and Excalibur have a horizontal airflow design that dries food much more evenly without rotating. The Excalibur in particular has a devoted following among serious dehydrators and food storage folks. It’s built to last decades and has significantly more tray space. The tradeoff is price, starting around $150-200 for a good Cosori and considerably more for an Excalibur.
My honest recommendation: If you’re just testing the waters, a mid-range stackable dehydrator in the $50-70 range is fine. If you already know you’re committed to building a serious food storage supply, skip the starter model and put that money toward a Cosori or Excalibur. You’ll outgrow the stackable version faster than you expect. Also, I’m using less and less plastic around my house these days, and the stainless steel dehydrators are what I would recomment.
One more option worth mentioning: Facebook Marketplace and Craigslist. Dehydrators are one of those items people buy with good intentions and then never use. A gently used dehydrator for $40 is not an unusual find. I know because that’s exactly how I got started.
Storage Supplies
How you store dehydrated food determines how long it lasts. When I know my kids will be gobbling up the strawberry/banana fruit leather, I hardly bother! But for dehydrated tomato slices or sheets of marinara sauce I plan to store long-term, storage really matters. Here are your options from most to least effective:
Mason jars sealed with a vacuum sealer are my go-to for home storage. Use wide-mouth jars for easier packing, and use either a food vacuum sealer with a jar attachment (these are sold separately) or this extremely handy, hand-held sealer. Another option that works well is an oxygen absorber. Drop in an appropriately sized oxygen absorber, and seal the jar. Store in a cool, dark location and most dehydrated foods will last 1-3 years. The jars are reusable, inexpensive, and you can see exactly what’s inside.
Vacuum-sealed bags extend shelf life further by removing oxygen mechanically. Great for larger quantities or items you want to store longer. The bags aren’t reusable but the machine pays for itself quickly if you dehydrate regularly.
Mylar bags with oxygen absorbers are the gold standard for very long-term storage — five years or more for most foods. They block light and oxygen completely. Slightly more involved to seal properly but worth it for anything you’re putting away for serious long-term storage.
Zip-loc bags work fine if you’ll be using the food within a few months for camping trips, short-term rotation, snacks. Not suitable for long-term storage. When I dehydrate something like canned peach slices, this is what I use since I know we’ll be snacking on it.
Other Supplies Worth Having
A mandoline slicer is not strictly necessary but makes prep work significantly faster and produces uniform slices that dry more evenly. Consistent thickness means consistent drying time — no guessing whether a thicker piece is done when the thinner ones already are. A basic model runs $20-30.
Parchment paper is useful for dehydrating anything sticky or saucy when you don’t have fruit leather trays. It’s not a perfect substitute but it works in a pinch.
Fruit leather trays — even if you don’t plan on making fruit leather. These come in handy if you’re dehydrating something with a lot of juice or moisture or you’d like to try marinara sauce. Before ordering these, double check that you get the correct size for your dehydrator.
Need More Convincing?
Here are eight more reasons why dehydrating is my favorite way to preserve food.
- Dehydrate cooked rice and pasta to make instant versions for dehydrated meals and snacks for hiking, camping, and backpacking.
- Something is always in season! You’ll usually find the best bargains in produce when a particular fruit or vegetable is in season. Farmer’s markets, food co-ops, fruit stands, and pick-your-own-produce farms can offer fantastic bargains. All that fresh goodness easily transforms into dehydrated versions at a cost far less than commercially dehydrated foods.
- Variety! One day you can dehydrate apples, and the following, pasta sauce! Cook up several pounds of ground beef and turn them into “hamburger rocks”! When you find #10 cans of a fruit or veggie on sale, pour out the liquid, and place the food on your dehydrator trays for a few hours. Bags of frozen vegetables dehydrate just as easily.
- You’ll never have to run to the grocery store at the last minute for carrots or onions or potatoes or celery or green beans if you have jars of the dehydrated versions in your pantry.
- Take advantage of sales and bulk deals. Buy in large quantities without fear of wasting the food OR the money used to buy it.
- Use dehydrated foods to create complete dehydrated meals stored in mason jars or vacuum-sealed for any easy dinner on busy nights or when it’s too hot to cook.
- Store them at room temperature. However, while no freezer or refrigerator is required, you must still protect against enemies of food storage.
- It’s a great addition to your everyday pantry as well as setting some aside for your food storage pantry. Dehydrated foods rotate easily, store at room temperature, and give you a reliable supply of fruits, vegetables, and even complete meals without taking up much space.
Frequently Asked Questions
It depends on the food and how you store it. Most dehydrated fruits and vegetables stored in mason jars with oxygen absorbers or vacuum sealed will last 1-3 years. Stored in mylar bags with oxygen absorbers in a cool, dark location, many foods will last five years or more. The enemies of dehydrated food are the same as any stored food: heat, light, moisture, and oxygen. Control those four things and your food will last.
The test depends on the food. Fruits should be leathery and pliable with no moisture in the center when you tear a piece. If it’s still sticky or wet inside, it needs more time. Vegetables should be brittle and snap rather than bend. Herbs should crumble easily. When in doubt, err on the side of more drying time. Under-dehydrated food stored in a sealed container will develop mold, which ruins the entire batch.
Yes, though it’s less efficient than a dedicated dehydrator. Set your oven to its lowest temperature, ideally around 140-170°F, prop the door open slightly to allow moisture to escape, and place food on wire racks over baking sheets. The results are acceptable, but the process uses significantly more electricity than a dehydrator, and temperature control is less precise. Fine for occasional use, not ideal for regular food storage. Oven-drying does work very well with herbs, since they dry so quickly.
For some vegetables, yes. Blanching, briefly boiling or steaming before drying, stops enzyme activity that can cause vegetables to lose color, flavor, and nutritional value during storage. Carrots, green beans, broccoli, and corn benefit from blanching. Others like onions, peppers, mushrooms, and tomatoes can go straight into the dehydrator without blanching. Fruits generally don’t need blanching but some benefit from a dip in lemon juice to prevent browning.
A few possible causes. The slices may be too thick. Thinner slices dry faster and more evenly. Your dehydrator temperature may be too low. There may be too much food on the trays with not enough airflow between pieces. Or, if you have a stackable round dehydrator, the trays may need to be rotated. Give it more time, check the airflow, and resist the urge to pull food too early.
Absolutely, and this is one of the best budget dehydrating hacks. Frozen vegetables are already blanched before freezing, which means they’re already prepped for dehydrating. Spread them straight from the bag onto your trays, no thawing necessary, and dehydrate as normal. Frozen corn, peas, green beans, and mixed vegetables all work beautifully and are often cheaper than fresh. Watch for sales on frozen foods.
Most dehydrated food rehydrates simply by soaking in warm or hot water for 15-30 minutes, or by adding directly to soups, stews, and sauces during cooking. As a general rule, use enough water to cover the food and then some, it will absorb more than you expect. Fruits can be rehydrated in fruit juice for extra flavor. Don’t over-soak or you’ll end up with mushy results.
For fruits, vegetables, and herbs, yes. It’s one of the safest food preservation methods because the low moisture environment prevents bacterial growth. Meat is the exception and requires careful attention to temperature throughout the process to ensure safety. If you want to make jerky or “hamburger rocks”, look for instructions specific to those foods.
Freeze drying removes about 98% of moisture compared to dehydrating’s 80-95%, which gives freeze-dried food a longer shelf life, up to 25 years compared to 1-5 years for dehydrated. Freeze-dried food also rehydrates more completely and retains more nutritional value. The tradeoff is cost, space, and noise. A home freeze dryer runs $3,000-5,000 compared to $50-200 for a dehydrator, it takes up a lot of space between the unit itself and a vacuum pump. It can also take 24 hours or more to freeze dry a batch of food.
Yes, standard mesh dehydrator trays won’t work for anything liquid or semi-liquid like applesauce, tomato sauce, or pureed fruit. You need solid fruit leather trays or liners that fit your specific dehydrator model. Most dehydrators come with at least one, and additional trays are inexpensive. Parchment paper cut to size works as a substitute in a pinch but isn’t ideal for long drying sessions.
The Last Word
If you’ve been on the fence about dehydrating, the barrier to entry really is as low as I’ve described. A secondhand dehydrator, a bag of frozen vegetables, and an afternoon is all it takes to get started. Once you taste the results, and realize how easy and inexpensive it is, you’ll wonder why you waited this long.
I have to add home made jerky, good stuff. Easy to make, high in protein, good food on the go.
Did you make your own marinade to soak the meat in first? How long did it take to dehydrate?
Has anyone dehydrated potatoe soup? I know how to dehydrate potatoes but how do I dehydrate the soup part? Any ideas?
Well lisa, you know I have been having fun with my dehydrator.
Yep! Have you tried dehydrating sweet potatoes? I want to try those next, I think.
I havent, but my boyfriend has. He says clean them, cut out the bad spots and slice them up (he likes to leave the skin on, but that is optional, but the skins have a lot of vitamins in them). Then take the slices, put them into a pot, and bring the pot to a barely a boil. When it starts boiling, turn the heat off, put on the cover and let them set for 15-20 minutes till they are fork tender. Once tender, take a slotted spoon, lift them out and put them in your dehydrator and dehydrate them. When done they should be crisp. They should look orangy brown.
Lisa;
Dehydrate2store has a great youtube channel and shows how to do Sweet Potaoes..
I was wondering what kind of wheat grinder do you have??
I have an old Magic Mill, which they don't even make anymore. It's electric. I would like to also have a manual grinder as a back-up. A friend who has a manual grinder says that it is just inconvenient enough that she procrastinates grinding wheat. I know that would be me, so for now I'm sticking with my electric mill until I have the extra $$ for a manual grinder.
We have been drying yams over two years now. My husband was buying these rawhide chews for our dogs and I noticed they said they were stuffed with yams. So I said why pay almost $12 a bag for the rawhide chews when I can dry the yams myself for treats. I didn’t like them eating the rawhide and I didn’t like products from China. The dogs love them like candy! Of course our dogs love fruits and veggies anyway. They don’t care for dried carrots or fresh bananas. But they really like dried bananas, I guess because they are higher in sugar taste than fresh ones.
I also love my dehydrator, which I bought last summer and used the heck out of till winter, when there's nothing in my garden that wants dehydrating and there haven't been any great sales on produce in my area for things I like to dehydrate, like celery, peppers, mushrooms.
Question:
Do you peel those tomatoes before you dehydrate them? If not, is that a problem with the texture either in the dehydrated state or when re-hydrated?
Also, rather than pour out the liquid in fruits and vegetables, whether for dehydrating or any other reason, I now like to pour the liquid into a tupperware or plastic bag and stick it in the fridge or freezer where it's handy the next time I make soup, stew, a casserole or crock pot meal, or any other savory (not sweet) recipe that calls for water or broth. It's even good for adding that extra bit of moisture you need when reheating a lot of dishes, especially those with pasta or rice. Lots of vitamins and flavor in that water, and it makes me feel good to be doing something else toward reducing our food waste.
wonderful idea!
Lisa,
What's your best method for re-hydrating veggies for cooking?
Dehydrating is great. We rotate our deer meat and anything more than a year old becomes jerky. We also do dried fruit, parched corn, and hard tack for days that I don't have time to grab a lunch. A dehydrator is very handy in preparedness.
I just bought my first dehydrator from a guy on Craigslist. I asked why he was selling it, and he said he now has his own smokehouse so he no longer needs it. We met up, made our trade, then I thanked him and told him to "drive safe." Then he said he was off to "get supplies" for the house. I thought "Hey! He must be a prepper." Who else would have a personal smokehouse and call their shopping trip '"getting supplies?"
This is my first time reading one of your articles, and i must say it makes me want to get on Ebay and Craigslist and buy a dehydrator right now. I had always heard about the benefits of dehydration, but never paid too much attention to it, but this list made me change my mind. Great post.
Dehydrated foods take up so little space. It's definitely worth learning how to do this on your own. I haven't been happy with my attempts at dehydrating potatoes, so I've been buying those in #10 cans already dehydrated, but most everything else is simple, and I get great results. Hey, thanks for visiting my blog!
Potatoes are easy to dehydrate. They first need to be cooked a bit. then slice them however you want – a slice for stews or diced for soups. Then place them on the dehydrator and let them dry until they are very hard. If you do not cook the potatoes, they will turn black when dehydrated.
Check out thrift stores also, I found an old 10 tray Equiflo dehydrator at a thrift store for $6 and works great. The cabinet has some wear on the back corners but it’s just cosmetic.
I LOVE dehydrated pineapple. It is super easy to do (but I don't store it because I eat it way too fast). I heard a tip about tomatoes that works great. I put the fresh tomatoes in the freezer until they are frozen then I put the frozen tomatoes in hot water in the sink. The skins bust open and then you can just peel them off. It works well with cherry tomatoes and grape tomatoes. I also love to sprout tons of wheat and then dry it in the dehydrator and then grind it. It is super healthy and way more digestible when it is sprouted. But it tastes the same as regular wheat flour (better I think).
I use my dehydrator like crazy too. I swear that watching the how-to videos athttp://dehydrate2store.com/ changed my life! Sad, I know, but true. I already had the dehydrator, just didn't have the know how. Last week I rehydrated cherries in orange juice and cinnamon, then tossed them in a simple cinnamon bread. My kids loved it. Dehydrating has really helped me preserve my garden all year long and gives my kids more snack options. This week I ran out of dehydrated onion and I am almost out of dehydrated bell pepper. Last summer it seemed like I dehydrated too much, but I used it all the time. This year I will make sure I have enough to get through to the next harvest. My daughter uses the dehydrated lemons and limes in her tea all the time. I only use them in hot tea, but my daughter puts them in iced tea or ice water. My mom and I came up with some hot tea mixes. It was all ground spices, mint leaves, and dehyrdated fruits. Easy and tasty. This year I have convinced my mom to harvest the yarrow from her yard so we can make tea to help her arthritis. We will see how that one goes.
I have a few bags of frozen veggies I'm getting ready to dehydrate today. I love how dehydrated foods take up so much less space. It's amazing to see an entire bag of frozen corn, for example, shrink down to just a cup or so. Could you convince your mom to let you post one of her tea mixes? That sounds delicious!
I learned how to dehydrate potatoes from the dehydrate2store website. My family loves them in stews and au gratin dishes. The potatoes boil up really well and you would never know they were dehydrated. Whenever I use them in a new recipe, I don't tell my family. I let them tell me if they liked it or not, then I break the news. My husband is now sold on the idea. I have seen recipes for using them in potato salad, but I am not that brave yet. My sister and I are going to try to make a homemade version of instant potatoes pretty soon. If we put the dehydrated potatoes in her vitamix, grind them up and experiment with different recipes, it could work.
I've learned TONS from Tammy! She really is an amazing pioneer in the field of food dehydration and takes it way beyond anything I've seen elsewhere. In fact, I'm going to use one of her recipes at a food dehydration class I'm teaching this weekend at Cabela's.
I'm dehydrating frozen strawberries and making fruit leather from applesauce today. Tonight / tomorrow morning, I'm going to look for instructions on dehydrating the beef I'm browning today. Then, beef rocks tomorrow!
I bought an Excalibur dehydrator a few months ago and just began dehydrating some of the early foods from my garden. I dehydrated spinach, sliced apples, cantelope and i just pulvarized the oranges and lemons i dehydrated to make a powder…i did save some whole to use in teas and such. i love it…am learning daily.
I got a dehydrator for Christmas and want to try making some soups. How do I dehydrate my potatoe soup? My sauce is a mixture of Chicken Stock and Cream..can it be dehydrated?
Also, how do I make Butter Powder myself?
I'm a newbie….. I want to purchase a dehydrator – any suggestions? In addition any suggestions about storage.
Virginia, I always advise a newbie to start with a dehydrator found in a thrift store, garage sale, or on Craigslist. I have an American Harvest, which is several years old, and it works just fine. I do want the more expensive Excalibur brand someday, but for now, I'm happy with my $35 purchase.
I have had a dehydrator for some time, but my cheap one takes longer than I would like to do the job. I finally got up the courage to spring for a nine-tray Excalibur, and my kitchen smells YUMMILY of dehydrating bananas as I type. I'm so excited to use my new machine, as I got such good service from my cheap one, and think this one will be even better!
I'm using my mom's Excalibur that she bought in the 70's when I was a little girl. It works great and has lasted forever. They are worth the investment! We dehydrated strawberries and used them in homemade granola as end of the year gifts for the kids teachers. We made labels that said, " Thanks for a great school year. We hope you have a 'fruitful' summer." We are having so much fun with the dehydrator…beware, it's addicting!
I didn't think about it but dehydrated fruit is technically always in season. Great article. I am going to start dehydrating my own food to save me some money. Thanks for talking me into it.
I’ve been absorbed in reading your blog all week, thank you for all your tips and strategies!
I know this thread is old, but I wanted to add a site that I came across recently while looking for dehydrated food recipes: the backpacking chef He has some really great recipes and good tips for making and storing single serve portions (perfect for bug out bags!)
Liz, you beat me to posting the website! I am about to try my hand at dehydrating food and the backpackingchef.com site gave me some good instructions as well as ideas for making up 1 person meals that only need hot water. As a retiree, making a meal for one is often a challenge so am looking forward to trying some of his recipes & ideas.
1 person meal packets also sound like a good way to stockpile foods that would be lightweight and easy for an older person to carry, should they need to leave their home. I would be able to put many of these in the freezer, to extend their life.
Do you have any suggestions of a good cookbook for dehydrated foods that have alot of wonderful recipes? Amazon has alot of books on the subject and some have 4 and almost 5 star ratings. however whenever you read the 1 star i find tat the book may not be what I am looking for. I want to make veggie chips like the ones you spend a fortune on in the store. dehydrated green beans,yucca,taro,sweet potato, wasabi peas ect. fruit as well.
I do not take the skins from my tomatoes when I dehydrate them. I find that the flesh tends to stick terribly to my trays. so I just dehydrate smaller tomatoes and cut them in wedges which sit on thr trays skin side down. I love home dehydrated bananas. I slice the ripe (no green on the skin) bananas into a bowl containing water with a little bit of lemon juice and some vanilla extract. Then fish the slices out and dehydrate. Yummy chewy. It can be done without the lemon water but the banana slices get very dark. still sweet and chewy tho.
good idea!
Just started using my new dehydrator. I started with green, red and yellow bell pepper. What a surprise….they are so sweet and we have been eating them as snacks.
Next I sliced some early strawberries in half and then pureed some for fruit rollups. The pureed fruit was spread too thin on the plastic so they had a few holes, will pour it thicker next time. Not sure which way I like them best….and again, the flavor was really concertrated and sweet. The halved weren’t the prettest fruit in the world, but they do retain the red color. The strawberries didn’t last at our house. So tonight I was at Whole Foods looking for more strawberries.
I just found you on Pinterest and am loving your website! I, too, am a big dehydrator. I’m a Flight Attendant by trade, and I can take 5 days worth of food with me from home that weighs no more than a medium paperback book! Rockin’, right?
For those that wondered about dehydrating potato soup, it’s really easy! I talk about doing so on my blog (http://cradlerockingmama.com/traveling-on-a-ted-step-2-preparation/) but here’s the gist: cook your soup, let it get nice and thick, then refrigerate it! If you’re using a homemade broth (which you should) it will get sort of gelatinous in the fridge.
Then lay out either the silpat sheets or a layer of Saran Wrap on your dehydrator trays and use a soup ladle to pour out cup sized servings on the trays. Use the ladle to sort of flatten out the soup until its relatively thin, put the sheets in the dehydrator and let ‘er rip! Takes me about 12-15 hours, depending on humidity, at 125.
Rehydration is simple: cover with hot water! I usually do my rehydration on the road, so I use a thermos for most of my rehydration. So I put the dried soup in the thermos, cover with hot water, put the lid on, and after about half an hour enjoy a delicious, healthy homemade soup!
Hope that helps someone! Thanks again for your awesome website. 🙂
this is awesome! thank you so much for all the information. i am attempting to dehydrate whole meals so i can have easy meals to take along camping. you should also check out the website http://www.hungryhammokhanger.com he gives all sorts of recipies to make…good luck
I saw a large can of apricots in syrup. do you think if I drained then really well I could dehydrate them?
Yes, you can, and they’ll be delicious. Because of their higher sugar content, they will never get to that really crispy stage. Plan on using them up within a year or so, since they will still contain a bit of moisture.
great! I will.
I was wondering if cottage cheese could be dehydrated. I like to add it to spaghetti for the added protein.
Hi there!!!
I am just preparing my first batch of terra style chips for dehydration.
I love your ideas but I was curious on how you make the fruit leather etc. For the applesauce do you place it in something? So many questions would appreciate any insight you could give.
Many thanks,
Megan
Great article! I dehydrate just about every fruit and veggie I can get my hands on when they are on sale. Watermelon turns into a delightful chewy candy, tomato skins and extra tomatoes that don’t get canned get turned into tomato powder for sauce or soup, extra veggies get turned into vegetable powder. I make my own onion powder, garlic powder, and ginger powder. My dehydrator runs just about nonstop in the summer and fall. I love my American Harvest. It works hard all year long!
I dehydrate most anything. My method is unique and simple. http://durgan.org/2011/
http://durgan.org/2016/October%202016/21%20Ocober%202016%20Making%20Dried%20Tomato%20Powder./HTML/ 21 October 2016 Making Dried Tomato Powder.
Four trays of 750 ml each of tomatoes were made into a slurry, dehydrated and stored as a powder. These are the tomatoes ripening in the house. There are too many for immediate use, so this is the chosen storage method. Process is to blend into a slurry of about 750 ml with the addition of half a cup of nixtamalized corn to each blender full. The nixtamalized corn prevents the slurry from sticking to the pan when dehydrating. The dried slurry is scraped off into a plastic container to prevent the brittle pieces from flying all over. The dehydrator, Excalibur, was set at 125F for ten hours until dry. Storage is 250 ml canning jars.
Thanks for mentioning that dehydrated fruits and vegetables have an intense flavor. My husband and I had a large garden this year that produced far more vegetables than we could possibly eat. We want to preserve them but were worried about compromising flavor. We’ll have to start looking for dehydrating options in our area!
I got a small dehydrator in spring. I’ve dehydrated: frozen peas, frozen corn, tomatoes, basil, oregano, kale, chard, carrot tops, radish greens, apples, cat mint ( tea), celery, green beans, green onion, bell pepper, carrot, oranges, mushrooms, etc. have mango and more apple yet yo do. Also, more frozen veggies in freezer ( stir fry mix, broccoli, Italian veg mix, etc.) . I refuse to waste food, and even use the tops of peppers ( up to the stem part) that would be put in compost. When celery starts to wilt- in it goes! I have young fruit trees/ bushes and when they produce more- it will be dehydrated and/ or canned. Will try sweet potato soon. I pick up frozen veggies on sale and dehydrate them. I couldn’t grow enough peas to make a bag, and it would be more expensive than if I just bought and dehydrated. ( fertilizer, time, space, amendments to soil for now). It really saves space, too. It’s always there, variety ( as you stated), and easy. It’s for life now- won’t ever stop. I had bought previously dried : leeks, dried onions, peppers, carrots, tomatoes, etc, but now can do it myself- far cheaper than buying . On a plant based diet- this is a life saver! Thanks for article!