

Google Maps and Google Earth already show you exactly where your yard gets sun and where it stays shaded, making planning easier than ever with no equipment, no cost, and no guesswork required. This guide walks through how to use satellite view to spot the best (and worst) spots for a garden, with real backyard examples and a few tips most people miss, like checking the season your satellite photo was actually taken in.
Before you dig a single hole, look up. Or rather, look down — from space.
When you’re sitting down to plan your garden, you already have a tool that can show you exactly where your yard gets real sun, best places for your pots, and where it stays shaded all day. That tool is sitting on your phone right now: Google Maps or Google Earth. This isn’t about finding your house on a map out of curiosity, though you’ll get that too. It’s about seeing your whole property from above, before you commit to a garden bed or a landscaping project in the wrong spot.
I’ve used Google Maps and Google Earth for years to check out our home from a bird’s-eye view. Let’s do the same thing for your garden.

Some of the links in this post may contain affiliate links for your convenience. As an Amazon Associate, I may earn a small commission from qualifying purchases without any increase in price to you.
In this post
How to Use Google Maps & Google Earth for Garden Planning
Over the years I’ve often used Google Maps and sometimes Google Earth to check out how our home and property appear from a birds-eye view. Now, for your garden-planning project, let’s do the same!
- Simply open Google Maps or Google Earth—Google Earth might give you a better view, but I’ve had better luck with Google Maps.
- Enter your address.
- Switch to satellite view (it’s usually in the lower left corner).
- Zoom in, and you’ll instantly see your property from above—a whole new perspective for garden planning.
- Look for some of the features I mention in this article here as well as anything else that catches your eye and might affect what you grow and where you grow it.
Key Features to Identify
Once you locate your home on either of these sites, look for these things:
- Areas where shade lingers
- Areas that get a lot of sunlight
- Your water source—where’s that outdoor faucet?
- Outdoor areas typically used for children’s play or other family activities
- Best areas for your garden plot or raised beds.
Tips
- Use the “Street View” Feature. Combine the satellite view with Google Maps’ “Street View.” This can give you a ground-level perspective of your property, revealing details like fence heights, existing landscaping, and potential obstacles.
- Consider Your Soil. While Google Maps/Earth shows the layout, it doesn’t reveal soil quality. Research your local soil type and consider a soil test to help you choose the right soil amendments.
- Plan for Vertical Gardening. If space is limited, explore vertical gardening options. Trellises, wall planters, and hanging baskets can maximize your growing space.
- Check for Utilities. Before you start digging, check for underground utilities. Contact your local utility companies to have them mark the location of any underground lines.
- Plan for Rainwater Harvesting. Look at the roofline of your house. Where does the water flow? Can you add rain barrels to your downspouts?
- Check the date on your image. That satellite photo was taken at one specific moment, not year-round. If Google’s most recent flyover happened to catch your yard in the dead of winter, you’re looking at bare trees and shade patterns that won’t match July. If you download Google Earth Pro (still free), it has a historical imagery timeline that lets you flip between different seasons for the same spot — very helpful before you assume that sunny corner stays sunny all year long.
Want More Useful Info From Survival Mom?
Real-Life Backyard Examples
Take a look at these three examples. The growing spaces are outlined in red.
Example 1: The Spacious Backyard with Shade Challenges
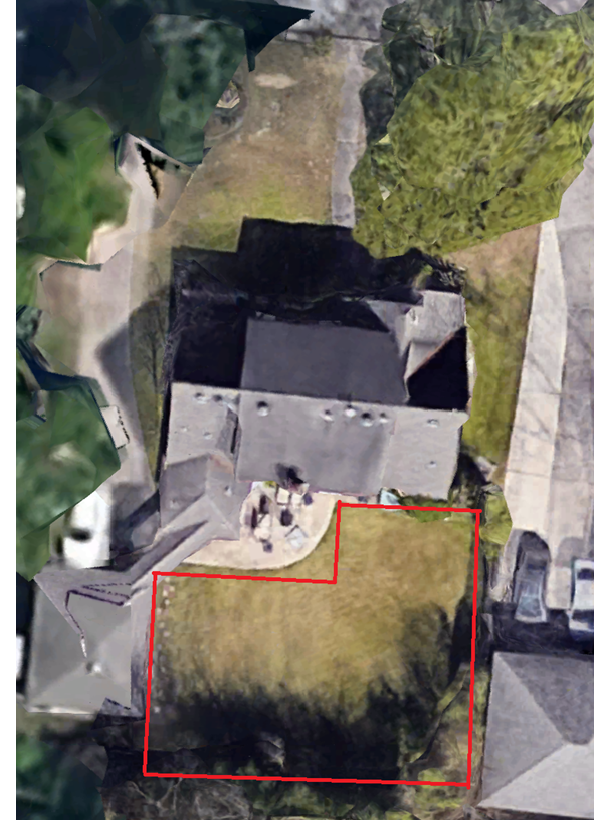
Look at that sprawling shade! If this were my home, the first question that pops into my mind is: How much sunlight actually reaches this spot during the hours of 11 a.m. to about 4 p.m.? Most food-producing plants will need at least 5-6 hours of sunshine in order to thrive. If this space gets less than that, I would then begin researching plants that do well with less sunshine. A local nursery and the county extension office could help with that.
From this photo, I would also note the areas that I CAN establish my garden without interfering with family activities and future landscaping plans. If you go through the trouble of building and cultivating raised beds, for example, you want them to stay in one place for a long time.
This bird’s eye view is also helpful with strategically planning where to place fruit trees, berry bushes, and efficient watering systems.
Example 2: The Compact Space with Heat Considerations
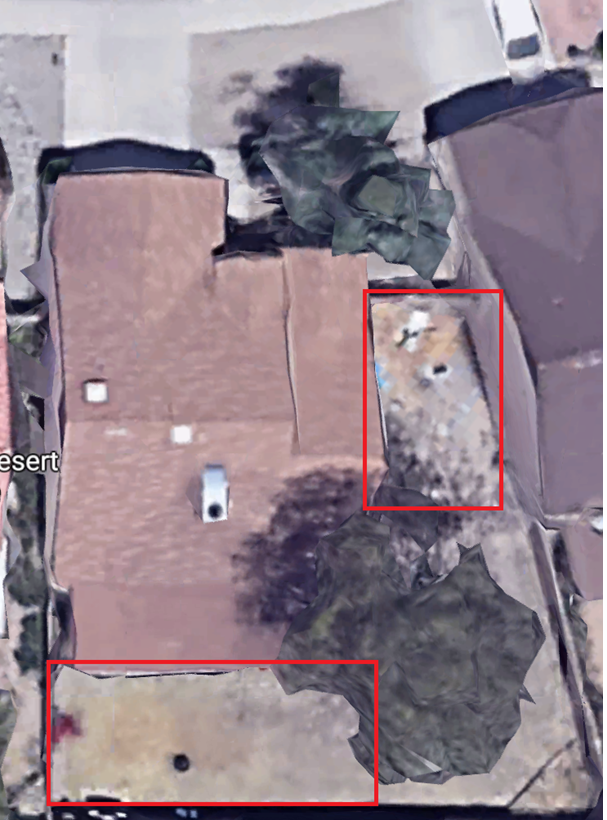
This house appears to have more challenges — less space, a large shady area, and a small space on the side of the house. Additionally, there are some hardscapes (cement, maybe a walkway) in the side yard that will require either removal or another gardening strategy, such as containers or a vertical garden.
And those concrete block walls? They’re like heat magnets! Certainly, this is going to be a factor in an area that experiences hot summers; it will affect how often watering is done and the types of plants that can be chosen. You’ll definitely want to know how to garden in drought conditions.
Example 3: The Deeply Shaded Woodland Garden
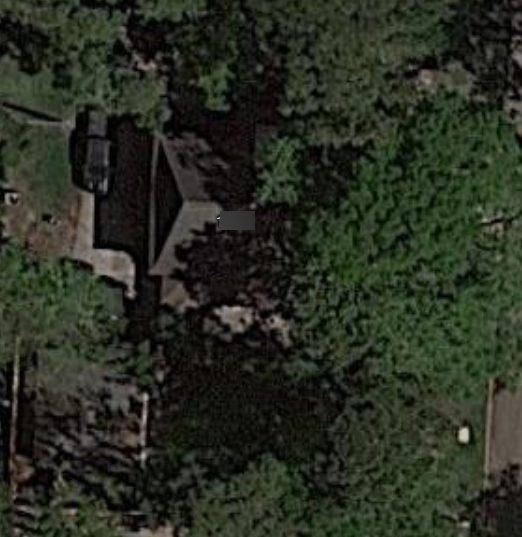
Yikes! With all those shade-producing trees, the wanna-be gardener is in for significant challenges. The types of vegetables that can be grown here is limited, and even a lot of herbs require plenty of sunlight for growth.
For sure, a gardener can transform a yard like this into something beautiful. He or she will just need to be very mindful of its limitations and maximize what can be grown.
FAQ
No, you don’t! Both Google Maps and Google Earth are free to use. Simply open them in your web browser or download the apps to your device.
Absolutely! Even in small spaces, you can identify sunny spots for container gardening or vertical gardens. The bird’s-eye view can help you see how sunlight moves across your space throughout the day. For paved areas, consider raised beds or container gardens to create your green oasis.
Once you’ve identified your sunlight and shade patterns, you can research plants that thrive in those conditions. Websites like the USDA Plant Hardiness Zone Map can help you determine which plants are suitable for your climate.
Your local nursery or county extension office can also offer personalized advice.
Sloped yards can create microclimates. South-facing slopes tend to be warmer and drier, while north-facing slopes are cooler and shadier. Consider terracing or using retaining walls to create level planting areas.
Yes, to an extent! You can identify the location of your outdoor faucets and plan the general layout of your watering system. For more complex irrigation systems, you might need to consult with a professional.
Related Gardening Content
- Turn Your Yard Into a Food Oasis with Backyard Farming
- 27 Tips from a Master Gardener
- Learn from My Many Gardening Mistakes
- Grow Food Fast: 13 Veggies for a Quick and Tasty Harvest
Ready to take your gardening to the next level?
Your next garden can be your best-ever when you have a solid understanding of all the pieces that come together to make any garden a success. My FREE, printable Gardening Self-Assessment gives you the insights and tools to make your next garden your best garden!
Your Turn! Explore Your Property
Now, it’s your turn! Open up Google Maps or Google Earth, take a look at your property, and tell me: What’s the most surprising thing you discovered? What are your biggest garden challenges or opportunities? Share your findings in the comments below!
I have done this for a while now. So helpful! Especially when moving to a new home. Each home location is different and has it’s unique challenges.