Beekeeping is one of those hobbies that sounds simple until you’re standing in front of a hive with 50,000 bees and no idea what you’re looking at. I’ve kept bees in Texas for years now, currently running multiple Langstroth hives, and I can tell you: the learning curve is real, the failures are part of the deal, and it’s still one of the most rewarding and fun things I’ve ever done. This guide covers what you actually need to know before you start — not just the gear list, but the mindset, the decisions, and the things most beginner guides skip.
Before you spend a dollar on equipment, run through this quick checklist. If you’re checking more boxes than not, read more at 14 Reasons to NOT Keep Bees before you commit.
You’re okay being stung. It will happen. Reactions can also change over time, so keep a Benadryl and an EpiPen accessible.
You have time for regular hive inspections — every 7–10 days in spring and summer. Bees are livestock, not a set-it-and-forget-it hobby.
You’re prepared to keep learning. What you don’t know can kill a hive fast.
Your neighbors and local ordinances allow it. Check before you buy anything.
You’re not expecting to make money. After five years and multiple hives, I’ve spent close to $4,000 and made a few hundred selling honey.
You can handle losing a colony. It happens to everyone, including experienced beekeepers.
Still in? Good. Here’s what you need to know to get started.
Understanding the Hive Before You Buy One
When we took our first beekeeping class and went to our first official Bee School, my head was spinning with all the new terminology.
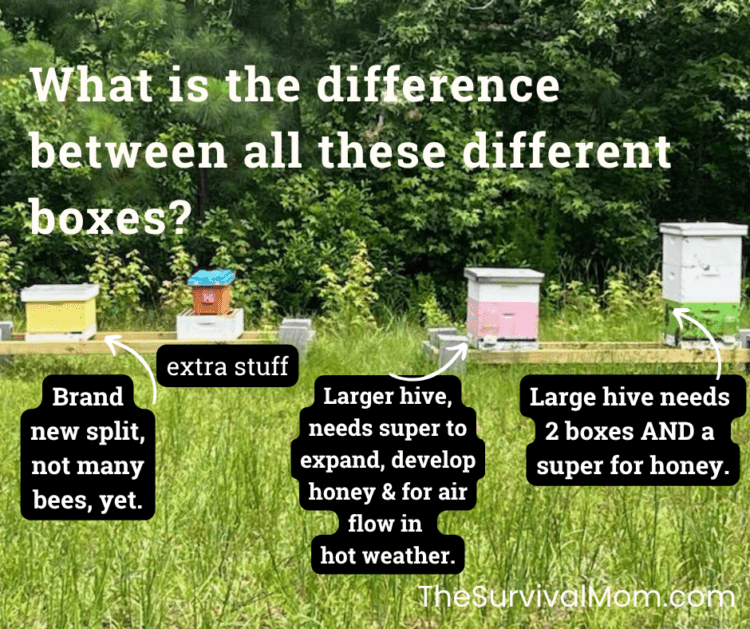
The Langstroth hive, which is what we use, is the standard rectangular box setup. This is what most beginners start with, and for good reason. Parts are interchangeable, widely available, and most of the beekeeping community is built around it. If you ever need advice or replacement equipment, Langstroth is the easiest path.
Here’s the basic anatomy from bottom to top:
Bottom board — the floor of the hive, with an entrance for the bees. A screened bottom board helps with ventilation, which matters a lot in hot climates. We keep a screened bottom board on our hives year-round.
Entrance reducer — a small insert that narrows the hive entrance. Used when the colony is new or small to help them defend against robbing by other bees or wasps.
Deep boxes (brood boxes) — the large lower boxes where the queen lays eggs and the colony raises brood. Most setups use two deeps — one primarily for the queen (although she’ll move between the boxes unless you use a queen excluder) and the other for most of the honey and worker bees.
Queen excluder — a metal or plastic grid placed between the brood boxes and the honey supers. The queen can’t fit through it, so she stays in the brood area and doesn’t lay eggs in your honey.
Supers — shallower boxes where the bees store surplus honey. These are what you harvest from.
Inner cover and outer cover — the roof of the hive. The inner cover provides an air gap; the outer cover keeps out weather.
You’ll also need a stand to get the hive off the ground, four cinder blocks and two wooden beams works fine. Keeping the hive elevated protects it from moisture, pests, and makes inspections easier on your back.
What Gear Do You Actually Need?
Like any hobby, beekeeping can cost as much or as little as you want to spend. Here’s what’s genuinely necessary versus what’s nice to have.
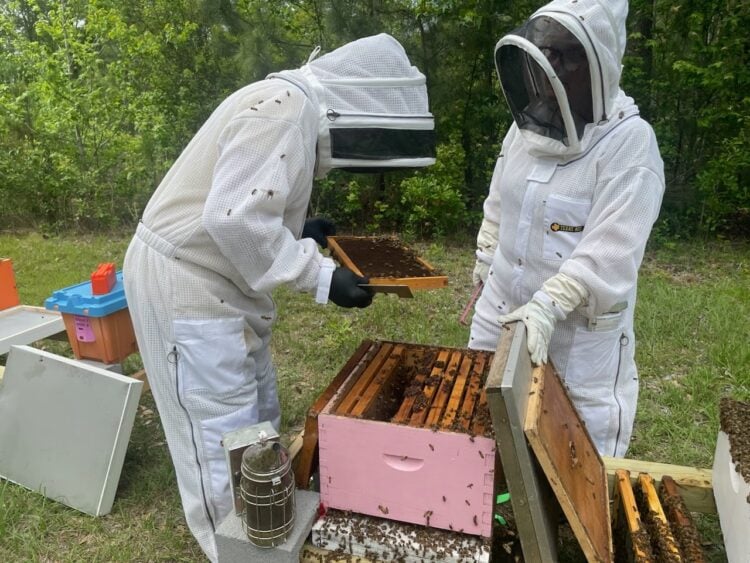
A full suit offers much more protection, but in Texas heat, 20 minutes in a full suit feels like a sauna. We purchased full, ventilated suits after our first full season of beekeeping. At $250 or so each, they’re an investment, but for my peace of mind? Priceless.
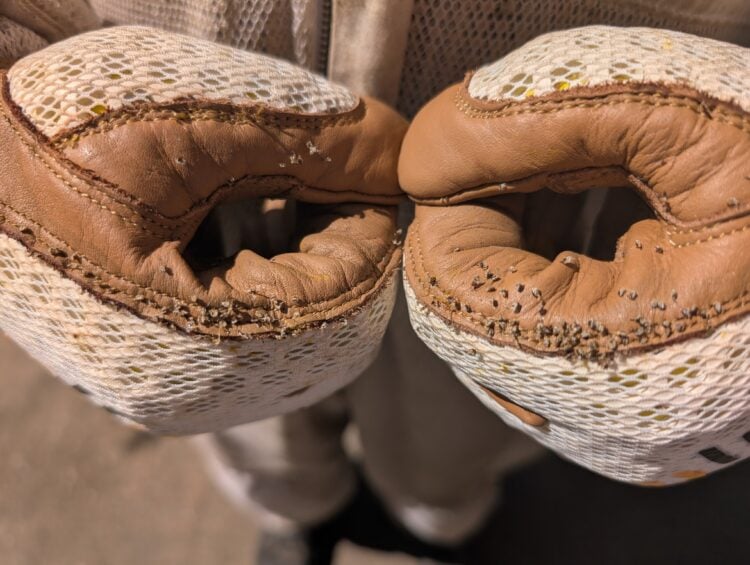
Gloves are debatable among experienced beekeepers, but after seeing this pic of all the stingers in my husband’s gloves, well, you decide if they’re important or not!
I’ve seen the beekeepers on YouTube who don’t wear gloves or any protection, but that’s not what I can recommend. You just never know what mood your bees will be in. They can be set off by very hot weather, over-crowding in the hive, a mean and nasty queen, or just the color black! Go ahead and invest in a solid pair of gloves that have elasticized bands at the elbows, and you can’t go wrong.
A smoker is essential. Cool, white smoke calms and confuses bees by triggering a feeding response. They think there’s a fire and start eating honey rather than defending. Light it with wood pellets or burlap, we often use dried leaves and pine needles, and be sure to get it going well before you open the hive, and keep it lit throughout your inspection. Smoking a hive is a skill, so learn from another beekeeper, bee school, or YouTube videos by experts such as David Burns and Bob Binnie.
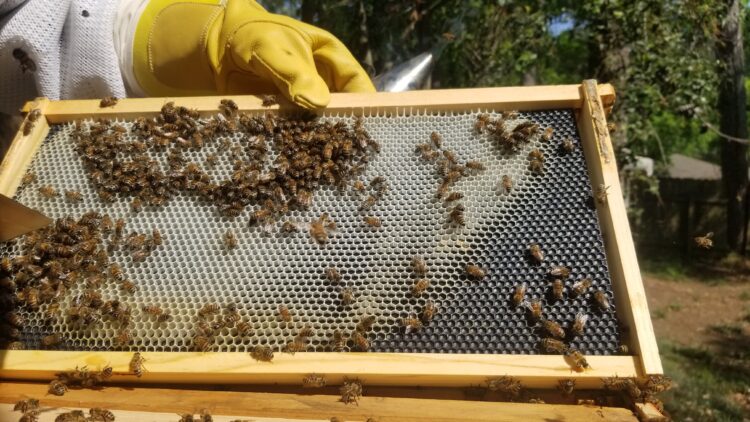
A hive tool is the flat pry bar beekeepers use to separate boxes and frames that bees have glued together with propolis. Don’t try to work a hive without one. Once, my daughter and I got to our bee yard without one, and thankfully, a large pocket knife was in the glove box! It did the job, but only because we didn’t need to put a lot of force to open the hives. The heavy-duty pry bar is sturdy enough to separate boxes and frames that have been glued together with the bees’ propolis.
Nice to have later: the more expensive suit if you’ve decided you’re going all-in, a bee brush for gently moving bees off frames, a honey-spinner — but only after you have established hives and plan on doing a good deal of harvesting.
Online communities are another solid resource, especially when you have a quick question between hive inspections. Facebook has several active beekeeping groups ranging from beginner-friendly to highly technical. Reddit’s r/Beekeeping is worth bookmarking too. Just go in knowing that beekeepers disagree on plenty — queen excluders, mite treatment protocols, whether to feed in winter — and you’ll get contradictory advice on all of it. Take everything as input, not instruction, and default to what your local mentors and extension office recommend for your specific region.
There are three main ways to start a colony, and I’ve used all of them.
Nucleus colonies (nucs) are the best way to start, but in some locations, they sell out. A nuc is a small established colony — five frames of bees, brood, honey, and a laying queen — transferred into your hive. Because the colony is already functioning, it gets established faster and more reliably than a package. Check with your local beekeeping association for nuc suppliers.
Catching a swarm is free and exciting and completely unpredictable. Our very first experience with bees was when a tiny group moved into our owl box in the backyard. They stayed long enough to build some comb and honey, but then left.
Swarms happen in spring when a colony outgrows its space and the queen leaves with half the bees to find a new home. If you get a call about a swarm cluster hanging from a tree branch, that’s an opportunity. Local beekeeping clubs often have swarm lists.
When you’re comforable with handling bees, go on a swarm call with an experienced beekeeper to learn how to catch one. A caught swarm is a wild colony that may or may not be gentle, but they’re usually in a calm state when they’re swarming and surprisingly easy to collect.
Package bees are a screened box containing roughly 3 pounds of bees and a caged queen. These are more affordable. Like nucs, you can order them in winter for spring delivery. The downside is that the queen and the worker bees are strangers to each other, so there’s a release and acceptance process that takes a few days.
My recommendation for beginners: start with a nuc if you can get one locally. And start with two hives, not one. Having a second hive gives you a comparison point and a backup source of brood or bees if one colony struggles.
Hive Placement: This Matters More Than People Think
In Texas, heat management is the biggest challenge I deal with. A hive in full afternoon sun in July can be a stressed hive, but due to its placement, it’s also unlikely to have a hive beetle problem. Bees spend enormous energy fanning and cooling the hive instead of foraging and building. A colony under a lot of stress due to heat, sunlight, too much shade — that kind of stress is more prone to problems.
Morning sun, afternoon shade is the ideal setup in hot climates. The morning light encourages early foraging; the afternoon shade keeps the hive temperature manageable. A large tree to the west of the hive is worth more than any fancy equipment.
Other placement considerations: face the entrance away from foot traffic paths. Bees fly a direct line from the entrance, and you don’t want that flight path crossing your back door or a neighbor’s yard. A fence or hedge behind the hive forces bees to fly up and over rather than at face level.
Water access is very important and often overlooked. Bees need water to cool the hive, and they’ll find it whether you provide it or not. It might be in a neighbor’s pool or pet dish. Put a shallow water source near your hives early, before they establish a habit somewhere else. A pan with pebbles or corks for them to land on works well.
Check local ordinances before you place anything. Most Texas municipalities allow backyard beekeeping, but setback requirements vary. Your local beekeeping association will know what applies in your area.
Your First Year: What to Expect Season by Season
Spring is the busiest time in the hive, and it’s when you, as a new beekeeper, will get your bees. The queen ramps up laying, the colony grows fast, and your main job now and into the summer is adding space before they feel crowded enough to swarm. When 7 of your 10 frames are full, add another box. Spring is also when varroa mite and hive beetle populations start climbing. Experienced beekeepers can help you identify potential problems.
Summer brings the peak colony population. This is the time of “the flow” — that part of the season when the flowering trees and plants in your area are at their peak. They provide bees with the maximum amount of and, depending on your region, a slowdown in nectar flow during the hottest weeks. Heat and drought stress hives in warm climates; in cooler climates, summer is often the most productive foraging season. Either way, keep water available and watch mite levels, which build fastest when brood production is high.
This is also the time of year when most beeks will harvest honey. The date we keep in mind here in southeast Texas is July 4. Right around early to mid-July is prime honey-harvesting season, but this can vary depending on how the summer weather and The Flow have been doing.
Understanding “The Flow”
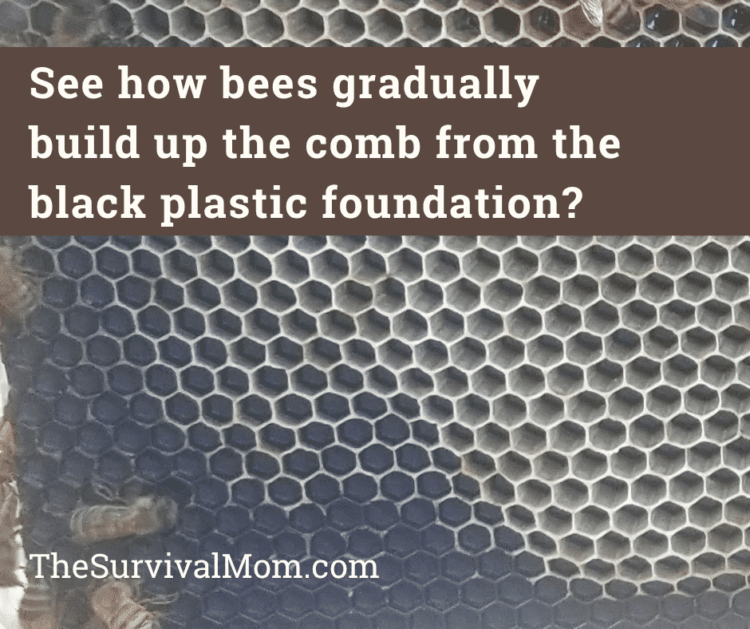
Beekeepers use the term the flow, or nectar flow, to describe the period when local plants and trees are at peak nectar and pollen production. This is when your bees shift into high gear, foraging from sunup to sundown, drawing new comb, and filling frames with honey fast enough to surprise you.
You’ll know the flow is on when hive entrance activity surges dramatically and you start seeing fresh white wax inside the hive. A strong flow can add several pounds of honey per day to a healthy colony.
This is when beekeepers get ecstatic, and describe the traffic in and out of their hives as a “crazy airport”. Be sure to ask beekeepers in your area what to look for so you’ll be ready for “the flow” with your own hives.
We were told, “Look in ditches, 70 to 72 days after the first bloom of blackberries and dewberries. That’s when the tallow trees bloom and the flow starts.”
Well, we don’t have either type of berry bush, and those instructions might be accurate, but for us as new beeks, it wasn’t much help. So, we kept asking, and eventually came to identify the tallow trees in our area and looked for new, white blossoms.
During the flow, you’ll need to check on your hives every few days, especially the busiest ones, because this is the time when they quickly get overcrowded. This leads to “swarming”, when a new queen has been produced by the hive, and the old queen takes off with a lot of the hive’s bees to start a new colony.
Your job during the flow: add space before the bees need it to avoid swarming.
After the flow ends comes the dearth, a period of low nectar availability when colonies stop building and start surviving. Don’t harvest so aggressively during the flow that you leave nothing for the dearth.
Fall is getting to the end of harvest time for most beekeepers, once the colony has built up a clear surplus above the queen excluder. It’s also the season to assess winter readiness: check stores, treat for mites if levels are elevated, and make sure the colony is strong enough to cluster through the cold months. Don’t take more honey than you can spare. A colony needs 60–80 pounds of stores to overwinter well. We always leave more honey than we think our bees will need.
Winter means reduced activity but not zero management. Check periodically that stores aren’t running low, especially after a long cold stretch. Minimal hive intrusion is the rule. Open the hive only when temperatures are warm enough that you won’t chill the brood.
The Three Things That Kill Most Beginner Hives
Losing a hive is a gut punch every beekeeper has experienced. I’ll never forget opening our first hive back in 2017, when spring was approaching and seeing nothing but piles of dead bees.
After talking with our beekeeping instructor at The Bee Supply, we realized our bees had starved over the winter. I felt terrible, and it was a learning experience for us. We hadn’t even harvested any honey. We just didn’t know we should add something like a sugar brick to their hive to ensure they had enough to eat.
Most losses come down to three culprits, and all three are preventable once you know what to watch for.
Starvation is more common than people expect, and it’s entirely avoidable. Bees need 60–80 pounds of stored honey to get through lean periods, whether that’s a summer dearth or winter. New beekeepers who harvest too aggressively, or like us, don’t realize how quickly stores can deplete, come out one morning to a dead hive with frames full of empty cells. Before you harvest anything, make sure the colony has more than enough to sustain itself. When in doubt, leave it.
Varroa mites are the number one disease threat to managed colonies worldwide, and the reason most beginner hives don’t survive their first few years. Varroa destructor is a parasitic mite that attaches to bees and reproduces in the brood cells, weakening individual bees and spreading viruses through the colony. The insidious part is that a colony can look fine until it suddenly collapses. The damage builds invisibly over months.
You can expect that every hive has varroa. The question is whether the population is at a manageable level or a fatal one. Monitor mite levels regularly using an alcohol wash (most accurate), a sticky board that collects dead varroa and varroa residue, or doing a sugar roll sampling about 300 bees and counting the mites.
Treatment thresholds are generally around 2–3 mites per 100 bees during brood-rearing season. Fortunately, research into new treatments have produced innovative products that don’t require killing a few bees (alcohol wash) and leave both the honey and beeswax free of pesticides. As you work with your bees, you’ll learn more about the various treatments available.
Small hive beetles are a serious and underestimated threat, especially in warm, humid climates. We lost a large, established hive to hive beetles last year — not a struggling colony, a strong one. I had been looking forward to getting a huge harvest from that hive, but one day I went out and smelled a fermenting smell. Due to days of rain, hive beetles had completely overrun our hive, and those bees were destroyed.
Small hive beetles lay eggs in the hive, and the larvae tunnel through comb, fermenting honey and destroying brood in the process. A strong colony can usually keep beetle populations in check, but a colony under any other stress like heat, a failing queen, or a high mite load can be quickly overwhelmed.
Beetle traps placed inside the hive are your first line of defense. Several effective designs are available, most using oil to drown the beetles. What we’ve found to be very effective is simply placing peppermint candies on each corner of the inside box. The peppermint oil wards off hive beetles.
Keep the area around your hives clean and free of debris where beetles like to pupate in the soil. If you see a heavy beetle presence during an inspection, don’t wait — act immediately. A bad infestation can devastate a hive in days.
The pattern with all three of these: by the time it’s obvious, it’s often too late. Regular inspections every 7–10 days during active season are what give you the window to catch problems while there’s still time to fix them.
Budget $300–$500 for a starter hive kit, protective gear, and your first package of bees or nuc. That’s the floor. Costs rise quickly once you add a second hive, replace lost colonies, sign up to attend a bee school or conference, or expand your equipment. Don’t expect to recoup your investment through honey sales alone.
What’s the best hive type for beginners?
The Langstroth hive is the standard recommendation for beginners. Parts are widely available, interchangeable, and virtually all beekeeping advice, mentorship, and resources are built around it. Once you’re comfortable, you can experiment with other styles like the top-bar.
How often do I need to inspect my hive?
Every 7–10 days during spring and summer when the colony is active. Less frequently in fall. Minimal intrusion in winter unless you’re checking stores or treating for mites. Regular inspections are how you catch problems like starvation, mites, hive beetles, or a failing queen before they become fatal.
When can I harvest honey?
Most beekeepers wait until the second year. Your first season the colony needs to build comb and store enough food to sustain itself through a dearth or winter. If you have a strong colony with clearly surplus capped frames above the queen excluder late in the season, a small first-year harvest may be possible, but when in doubt, leave it for the bees.
Do I need a license to keep bees?
Requirements vary by state and municipality. Many states require hive registration rather than a formal license. In Texas, for example, you register with the Texas Apiary Inspection Service (TAIS), which is free. Always check local ordinances as well, since some cities and neighborhoods have restrictions on hive placement or number of hives.
How do I know if my bees are healthy?
Regular inspections tell you most of what you need to know. A healthy hive has a laying queen with a solid brood pattern, bees of all ages, capped honey and pollen stores, and manageable mite levels. Warning signs include a spotty brood pattern, a sudden drop in population, excessive dead bees at the entrance, visible hive beetles or their larvae, or bees that seem lethargic or disoriented.
Ready To Start?
Beekeeping has a learning curve that never really ends. I’ve been doing this for nine years, manage multiple hives, and my bees still surprise me. That’s part of what makes it worth doing.
If you’re serious about starting, take a class before you buy anything, find a local mentor, and register your hives with your state apiary inspection service. Local bee schools usually take place in the spring and summer, so be sure to look online for those.
Then order your bees early, get your equipment assembled before they arrive, and be prepared to make mistakes. Everyone does.
The first time you pull a frame heavy with capped honey that your bees made from flowers in your own backyard, you’ll understand why beekeepers put up with everything else that comes with it.
16 thoughts on “Beekeeping for Beginners: What I Wish I’d Known Before My First Hive”
Prepared Grammy
I started beekeeping this spring, and also experienced problems. One hive left, and I had to split the second hive. I finally joined a beekeeping club last week, even though I had to drive an hour and twenty minutes to get there. A member came to look at my bee hives today. She was extremely helpful, and gave me a lot of good advice. It turns out that I need to do some immediate work on both hives. One needs another super added before they swarm. The other needs more brood in order to survive the winter. Thankfully I can move a frame of brood from the stronger hive to the weaker one. Good luck on your endeavor, and have a ‘beeautiful’ day.
This is why we are still at the point of having all the supplies and tools — but no bees! My husband probably researched TOO much and learned about everything that can go wrong, and then got cold feet!
Thanks for this. It helps when people dont make it look too easy. I really feel better knowing failure is part of the journey. I don’t have land but it is my dream to have some and bee keeping will be part of that. Best wishes 4 ya.
Vicky, two Christmases ago I bought my husband everything he needs for beekeeping, except the bees. He has never bought his swarms because he’s afraid he’ll do something to kill them!! So, here we sit with all the beekeeping paraphernalia, but no bees! LOL
Beekeeping is a very rewarding hobby. Yes, you will have failures. I still do and I’m a master beekeeper. There are so many things we can not control ! Hang in there. When things go right it makes the failures less important.
Hi
I also started with 2 hives. I went to a bee school before buying anything. I thought I was doing great the 1st winter. My hives came thru but in about April I didn’t see any bees flying so I opened up the hive and no bees. The screen was just loaded with dead bees. The reason I lost them was I didn’t treat for mites.This happen to both hives. SOOOOO I bought 1 more nuc last spring. I looked at them real close before I put them in the hive and they had mites. So I powdered sugared them in the nuc box and let them go for a day. When I but them in the hive I didn’t see any mites. In August of last summer I treated them. So far they seem to be doing ok. They have been out flying these last couple nice days.
I plan on treating them again as soon as it get warm. I am hoping I can split them come spring.
Just keep trying
Karen
I enjoyed reading about your adventures with beekeeping! I also want to become a beekeeper but feel I need a mentor and a hive to Bees it before venturing on my own!!! I am planting lots of bee flowers this Spring at a local community garden where they have agreed to allow me to put hives. Baby steps, flowers this year and hives next year when all is set and ready! Please write more, love to hear about what is happening in your bee world!
I’ve been running bees since I was 11 years old,(now 67!). It’s good to see that people are interested ! Bees are part of Nature and success and failure is part of HIS plan. Don’t get discouraged with the tough years and enjoy the Good years. And here is one of the secrets of beekeeping……whenever you get a chance, put your bee veil on, sit on the ground in front of your hives and spend some time just watching them. It’s good for the Soul! Good luck and Happy Beekeeping!
Josephine, you’ll need a bee box and frames at the barest minimum. If you’re on Facebook, this is a group that may be able to give you specific advice, https://www.facebook.com/groups/africabeekeepers


I started beekeeping this spring, and also experienced problems. One hive left, and I had to split the second hive. I finally joined a beekeeping club last week, even though I had to drive an hour and twenty minutes to get there. A member came to look at my bee hives today. She was extremely helpful, and gave me a lot of good advice. It turns out that I need to do some immediate work on both hives. One needs another super added before they swarm. The other needs more brood in order to survive the winter. Thankfully I can move a frame of brood from the stronger hive to the weaker one. Good luck on your endeavor, and have a ‘beeautiful’ day.
This is why we are still at the point of having all the supplies and tools — but no bees! My husband probably researched TOO much and learned about everything that can go wrong, and then got cold feet!
It is nice to start with two hives in case one doesn’t do as well.
We were given that same advice. Thanks!
I’m looking forward to hearing more, I’ve been toying with the idea myself and seeing my sister with bees makes me think I could to it too.
Thanks for this. It helps when people dont make it look too easy. I really feel better knowing failure is part of the journey. I don’t have land but it is my dream to have some and bee keeping will be part of that. Best wishes 4 ya.
Vicky, two Christmases ago I bought my husband everything he needs for beekeeping, except the bees. He has never bought his swarms because he’s afraid he’ll do something to kill them!! So, here we sit with all the beekeeping paraphernalia, but no bees! LOL
Beekeeping is a very rewarding hobby. Yes, you will have failures. I still do and I’m a master beekeeper. There are so many things we can not control ! Hang in there. When things go right it makes the failures less important.
Hi
I also started with 2 hives. I went to a bee school before buying anything. I thought I was doing great the 1st winter. My hives came thru but in about April I didn’t see any bees flying so I opened up the hive and no bees. The screen was just loaded with dead bees. The reason I lost them was I didn’t treat for mites.This happen to both hives. SOOOOO I bought 1 more nuc last spring. I looked at them real close before I put them in the hive and they had mites. So I powdered sugared them in the nuc box and let them go for a day. When I but them in the hive I didn’t see any mites. In August of last summer I treated them. So far they seem to be doing ok. They have been out flying these last couple nice days.
I plan on treating them again as soon as it get warm. I am hoping I can split them come spring.
Just keep trying
Karen
I enjoyed reading about your adventures with beekeeping! I also want to become a beekeeper but feel I need a mentor and a hive to Bees it before venturing on my own!!! I am planting lots of bee flowers this Spring at a local community garden where they have agreed to allow me to put hives. Baby steps, flowers this year and hives next year when all is set and ready! Please write more, love to hear about what is happening in your bee world!
I have recently became interested in beekeeping, and would love to hear more stories about the ups and downs of beekeeping…
I’ve been running bees since I was 11 years old,(now 67!). It’s good to see that people are interested ! Bees are part of Nature and success and failure is part of HIS plan. Don’t get discouraged with the tough years and enjoy the Good years. And here is one of the secrets of beekeeping……whenever you get a chance, put your bee veil on, sit on the ground in front of your hives and spend some time just watching them. It’s good for the Soul! Good luck and Happy Beekeeping!
if you want some absolute beekeeping gold >>>>
http://www.survivorlibrary.com/index.php/8-category/13-library-bee%20journal%20(american)
http://www.survivorlibrary.com/index.php/8-category/14-library-bee%20journal%20(british)
http://www.survivorlibrary.com/index.php/8-category/15-library-beekeeping
http://www.survivorlibrary.com/index.php/8-category/16-library-beekeeping%202
Those are amazing resources! Thanks for sharing this.
Am for the bee starter kit, can you please help.
am I southern Africa, Zambia to be specific. we have a lot of bees here.
Josephine, you’ll need a bee box and frames at the barest minimum. If you’re on Facebook, this is a group that may be able to give you specific advice, https://www.facebook.com/groups/africabeekeepers