

Most emergency cooking plans assume you’re building a campfire or cooking over an open flame in the middle of your living room. This one doesn’t. My four-step system uses a power bank, an electric kettle, just-add-water pantry meals, and no-cook snacks to put hot food on the table without any open flame, fumes, or pioneer skills required, all from the safety of your own kitchen. I’ve tested this, and it works! Clean energy, quick meals.
When the power goes out, the last thing you want is to be standing in your kitchen wondering how you’re going to feed your family with no stove or oven. I mean, you’re hardly a Mountain Man/Woman used to cooking over an open fire out on the prairie!
You’ll be happy (and relieved) to know that a cooking emergency, cooking “off-grid”, in your own kitchen is easier than you might think. It’s as easy as 1, 2, 3, 4 with my simple plan.

Some of the links in this post may contain affiliate links for your convenience. As an Amazon Associate, I may earn a small commission from qualifying purchases without any increase in price to you.
In this article
- The struggle is real: no power
- How to Cook During a Power Outage (No Stove, No Flame)
- Step One: The power bank solution
- Step Two: The electric tea kettle
- Step Three: Just-add-water foods
- Step Four: Add no-cook foods
- Putting it all together
- Related Off-Grid & Power Outage Resources
- FAQ
- Ready For More Useful Info From Survival Mom?
The struggle is real: no power
Our home loses power a few times each year. Occasionally due to a major storm but power outages from a tornado, hurricane, or damage to a power station can all disrupt our home’s reliable power.
Emergency cooking requires some sort of power for the heat source. A rocket stove, campfire, hibachi grill, volcano stove — they all require an open flame. Inside your home, this isn’t safe or recommended, not only due to the flames but the risk of carbon monoxide poisoning.
Solar cookers are a terrific, clean way to cook food when the power goes out, but they can only be used outdoors and require plenty of sunlight and enough hours of sunlight for cooking when power is out. This isn’t a method you can instantly put to use, either. Over the years, I’ve cooked everything from brownies to stew in a solar cooker, and there’s a definite (sometimes steep) learning curve involved.
I recommend having multiple ways to cook during a power outage, but only one method is quiet, clean (no fumes), indoor-safe, and can be used by a child. That would be a power bank.
How to Cook During a Power Outage (No Stove, No Flame)
When the power’s out and you still need hot food, here’s the order of operations:
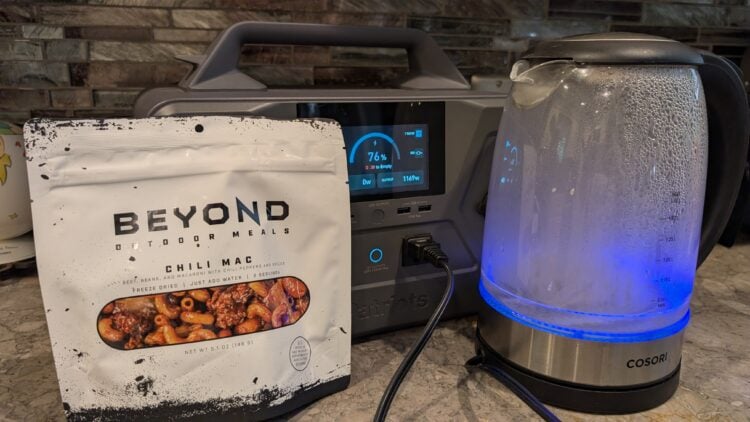
- Power bank (1500+ watts) — your power source
- Electric kettle — boils water in under 2 minutes off the power bank
- Just-add-water meals — oatmeal, instant soups, backpacking meals
- No-cook foods — nut butters, jerky, freeze-dried fruit, canned chicken
This plan has a very low learning curve, no need for a campfire, but a hot meal every time for any cooking emergency.
Step One: The power bank solution
A power bank is simply a large, portable battery that stores energy so you can run just about anything requiring electricity. They come in all sizes, but as a solution to power-outage cooking, I recommend one no smaller than 1500 watts.
Power banks are sometimes called “power stations”, and if they come with the capability of charging via solar panels, they’re referred to as solar generators. I’m all in favor of anything solar when it makes sense, and when a power bank needs to be recharged, solar panels are handy in an outage. However, it can take many, many hours for that recharge — something to keep in mind as you shop and compare prices, brands, and features. I keep my power banks charged up via an electric outlet in my house so they’re full and ready for emergencies.
Not only will your power bank provide the cooking power, it will be there when you need lighting, recharging electronics, and even running a small space heater. Move your power bank from room to room, wherever power is needed, and pack it in the car for trips, camping, and Little League games! It’s a purchase you’ll use again and again throughout the year.
Trustworthy brands of power banks: 4Patriots, Anker, Goal Zero, Jackery, and Ecoflow. Expect to pay $400-500, but you’ll find discounts throughout the year on Amazon and company websites. This investment is an important part of a long-term power outage plan.
Step Two: The electric tea kettle
With a power bank and a strategy for specific foods and meals, you only need an electric kettle to heat water to boiling in seconds. I love this particular appliance because it draws such a small amount of energy from the power bank, leaving you with plenty for other emergency uses.
You’ll find these kettles in most every home in Europe and the UK, which is where we first discovered them years ago in an Iceland AirBnB. That kettle heated water to boiling in seconds, and we could barely believe our eyes! It was a miracle.
Well, in a power outage and with a power bank, this kettle is definitely a miracle-worker. You’ll have hot water in seconds to add to instant oatmeal, a dry soup packet, a rice-and-beans meal and so much more.
Depending on how much water is needed, the water can reach boiling in barely over a minute, two or three minutes maximum. For a backpacker meal requiring a one cup of water, it reaches boiling in a little over one minute.
An electric kettle runs around $20-30 on Amazon, and there’s no need to buy a large-volume kettle. One that holds 1-1.5 liters is fine. When you’re ready to get that meal together, plug the kettle into your power bank and flip the kettle switch.
TIP: Take a look at these other, handy appliances, and if you want to use something like a rice cooker, for example, check the wattage required for that appliance and make power bank purchase accordingly.

Step Three: Just-add-water foods
I’m a from-scratch kind of cook, so I rarely shop for anything that calls for hot water only, but on a recent grocery trip to HEB, I was astonished at the number and variety of these handy meals.
Instant oatmeal is just the beginning! I found jambalaya, red beans and rice, instant refried beans, a couple dozen varieties of rice and pasta meals, soup mixes, ramen, and plenty of tasty, ethnic options like butter chicken. You can easily and quickly stock up on a dozen or more of these meals, store them in a cool location, and be ready for the next power outage.
For a frugal-minded plan, buy just one or two of these each time you’re grocery shopping. As a bonus, they’re handy for those dinnertimes when you have absolutely nothing ready or planned!
This is also the time to call in the big guns (at least in prepper circles) — those freeze-dried meals from companies like Mountain House and dehydrated mixes from Harmony House. You can read my reviews of some of these companies here. Add more protein to any of these mixes with freeze-dried meat.
Be sure the meals you choose are truly “just add water” and don’t require any additional boiling. When I tested a few Legacy Food meals, they all required boiling water and then an additional 12-15 minutes of cooking time. Those won’t work for this system since they require much more time and energy.
Step Four: Add no-cook foods
Finally, build a small stash of foods that require no cooking or heating at all. Think about any type of food that can be eaten right out of the package, and if they’re nutritious, that’s even better.
- Energy bars
- Protein drinks
- Trail mixes
- Dried fruit
- Nuts
- Packs of tuna and chicken salad
- Canned ravioli/pasta (eat cold)
- Nut butters with crackers
- Babybel cheese
- Freeze-dried fruit
There’s a lot to be said for grab-and-eat foods and snacks, and it’s the perfect, final addition to your power outage cooking plan.
Putting it all together
Shop for a power bank sized at 1500 watts or more so you’ll have plenty of power for the electric kettle. Stock up on “instant” type foods you know your family will eat, along with a supply of no-cook foods as snacks.
The power bank will be your biggest expense, but keep in mind, you’ll likely use it year-round. I have a small power bank I take with me whenever I’m using my laptop and want to make sure I have a power source. For an additional $20-30, you’ll have your kettle, and finally, add meals and snacks that suit you and your family.
When the power goes out, you’ll be ready without needing to build a campfire or channel your inner pioneer!
Related Off-Grid & Power Outage Resources
The Family Power Outage Survival Handbook (free download)
Two Ways to Quietly Run Chest Freezers During Power Outages
Generating and Storing Power with Portable Generators
Solar Generators: Your Key to Power Preparedness
FAQ
A power bank/power station does cost more. The size I recommend runs $400+, depending on the wattage. This is my #1 recommendation because of safety and having so many uses. A power station can cook a quick meal, run a refrigerator, keep electronics charged, a lamp on, and so much more. It’s portable, so you can move it from room to room as needed, and even young children can easily use it.
A camp stove is cheaper, but you have to be careful to use one that is labeled “indoor safe” or “approved for indoor use.” Be extra careful with use of the open flame and, especially, an increase in carbon monoxide. Have a carbon monoxide detector in the same room as the indoor-safe camp stove. Propane is a very safe fuel to store, which is a plus for a camp stove that uses it.
You’ll still need a way to run the refrigerator, possibly a small space heater, lights, and so much more.
Please, no! I have personal experience doing this, and what I learned is just how flammable tea lights are! They’re made from paraffin, a petroleum-based product and the melted wax ignites instantly.
Once the wax begins to melt, the small tea light container is filled to the brim, and it’s incredibly easy for even a small amount to slosh out and catch fire.
It looks like a cool and super-cheap way to get some warmth and heat food, but you don’t want to have anything in your home with such a high potential for danger.
Solar panels is the answer OR taking it to a location that does have power. Charging from an electric outlet is always fastest. Solar charging takes longer, depending on the number and size of panels you have.
Otherwise, have another one or two ways to cook food. Most off-grid cooking methods will need to be done outside, so keep that in mind.
Also, this is where having a backup or two (or four!) is good planning. Even if you can’t afford a second large power station, smaller ones can charge electronics and run a lamp or two at night.
Anything that can be used with the size of power bank you have. There are small rice-cookers, immersion heaters, and other small appliaances designed for boat and RV use. One example is the InstaFire Ember Oven.
Harmony house makes it impossible to see the net weight of each container and its not posted. Someone else said that they have no expiration dates posted on the containers either. Plastic jars, and plastic zip locks are not healthy long term storage containers. Also, I don’t see that they have any medium sized containers…just the small ones and a large box.
In addition to the kettle to boil water I have a electric fry pan, crock pot, and coffee maker. I was planning on using them to cook with my solar generator. I have it on my list to try and see if the solar will be strong enough to use with them.
What if water becomes contaminated? Then, how do you cook if you need to boil water for drinking and cooking? Won’t this make preparing a meal really tough? Do you recommend a water purifier/ Life Straw or some other brand?
Have you tested the food from 4Patriots? I see their ads a lot.
They must spend millions every year on advertising. I haven’t been able to test their meals since they don’t sell them individually, and I don’t care to buy a lot of meals at a time when I’m not sure how they taste. I’ve also had a hard time tracking down the nutrition information for them. The only suggestion I have is to buy the very smallest package they have and actually trying the food before relying on it in an emergency.